Putting fabric on a wall with starch has been around for a long, long time. I used this technique in my kitchen pantry a couple of years ago and I was shocked on how easy it went up and how easy it is to take down {I still have mine up, but I have pulled back a piece to see how hard it would be to take down, and it just peeled right off like butter}
Last weekend I used the fabric with starch on a bigger area at our river house guest bedroom. This time I did a whole wall and I am so pleased on how well it turned out. Of course I didn’t think before I left the house to bring my good camera. Then once I started the process, it dawned on me that some of you might like to know I how I did it, so iPhone pictures is all I got.
This is how the room looked before
But after 6 years of this, I was ready for a change. I wanted to add a more modern look to the room and use a pop of color and a pattern on the headboard wall. I knew wallpaper was too permanent, and the thought of taking it down when I tire of it was not appealing. And so I came up with the idea of using a bold fabric instead of wallpaper as the alternative. This whole concept is great for renters, or a designer like me who is constantly wanting to re-design a room.
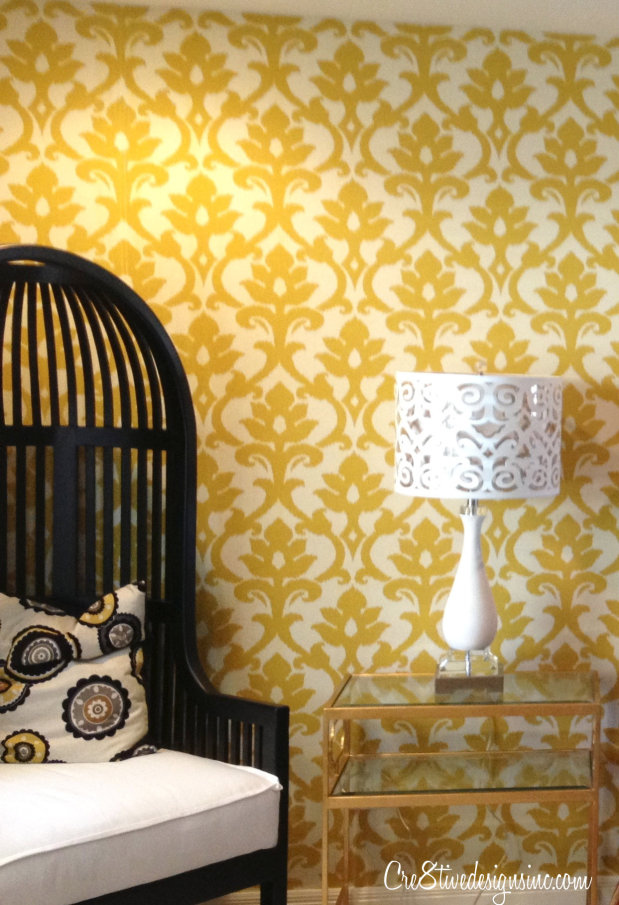
Here this is how it turned out
What a difference right? The room itself is still a work in progress. I wanted to get the fabric up on the wall so I could get a feel for the whole room before I finished everything else. It was a pretty painless and easy project that took me about 3 hours to complete. I had a helper, my sister, but it is doable with one person.
I purchased the fabric from Home Fabrics for $8.99 a yard. The type of fabric I used was a home decorator fabric, 100% cotton, which is about the weight of a duck cloth. Most of Joann’s home decorator fabrics would work. But you can not use velvets, the fabric would be too heavy for the starch to hold, or silks, because when they get wet from the starch it will leave water marks.
How to put fabric on the wall using starch
First you need to calculate how much fabric you will need. It is the same calculation as if you were to use wallpaper. I could try and explain how I figured out how much fabric I needed for my room, but I think this article on Home Made Design explains it much better than I could.
The wall I wanted to do was 11′ wide x 8′ tall. I calculated that I would need 10 yards, but I bought 13 just in case {which in the end came in handy when I accidentally cut one of my panels 12″ too short}
Then I got these supplies ready
Liquid starch, a paint tray, a sponge roller and an exacto knife. It took one full bottle of liquid stach to do my wall. So if you area is bigger, you will need more than one bottle of starch. It helps have a broad knife or a wallpaper brush to smooth out the fabric and press it into corners, but since I didn’t have either of these, I used a stiff piece of cardboard, and it worked just fine.
To make your job as easier, set up a large work area where you can lay the fabric out for cutting and applying the starch to the fabric. I improvised and cleared an area on the floor in another room lol. Your walls should be somewhat smooth, a heavy textured wall will not work for this application. You could lightly sand your wall to knock down the drywall mud areas for a smoother look. Luckily I didn’t have to do this. No need to prime the walls, but do wipe down the area to make sure you have a clean surface. My wall had a satin paint finish, and the starch adhered just fine.
Now that you’ve prepared your work area and prepped your surface, your ready to start hanging the fabric. The first thing I did was a dry fit. {no picture sorry} I examined the design of the fabric and determined where I wanted the pattern to meet the ceiling. Then I measured out the length of the wall adding 2″ for overlapping at the ceiling and floor. I didn’t have the confidence in myself to pre-cut each piece before I started, instead I choose to hang and cut each piece as I put them up. But you could use the first sheet of fabric as a template for cutting the next ones.
The wall and the back of the fabric both get starch. Note: I do not soak the fabric in the starch, which other people have done. I feel that soaking the fabric is overkill. And soaking the fabric means that you have to allow for shrinkage and potential wrinkles from stuffing it into a bucket, which I do not want to deal with. It works just as well my way, so I figure why add another step.
Once you have your first panel cut, use your sponge roller and roll starch on the area of the wall where the panel will go. Then lay your fabric panel, unfinished side up, on your work surface and roll starch on to the fabric. Use the “Book” methed by folding both ends of the fabric towards the middle, paste side in.
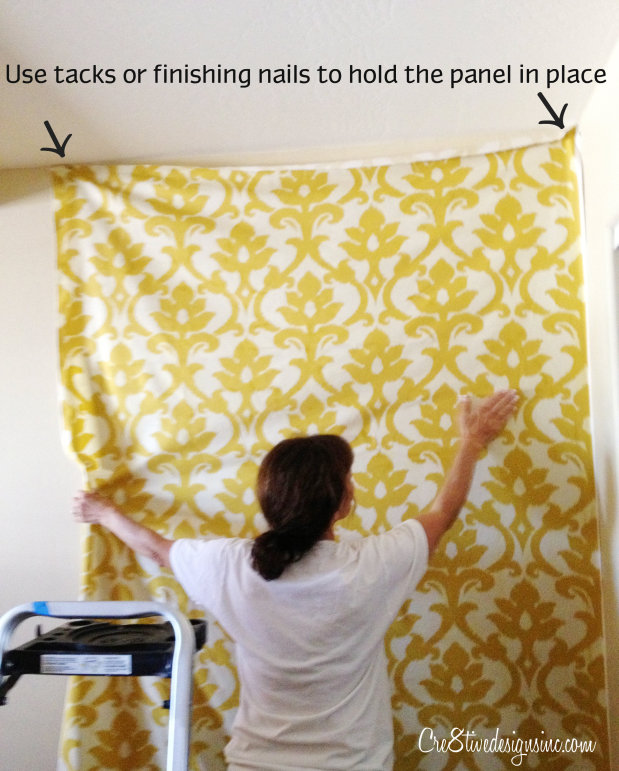
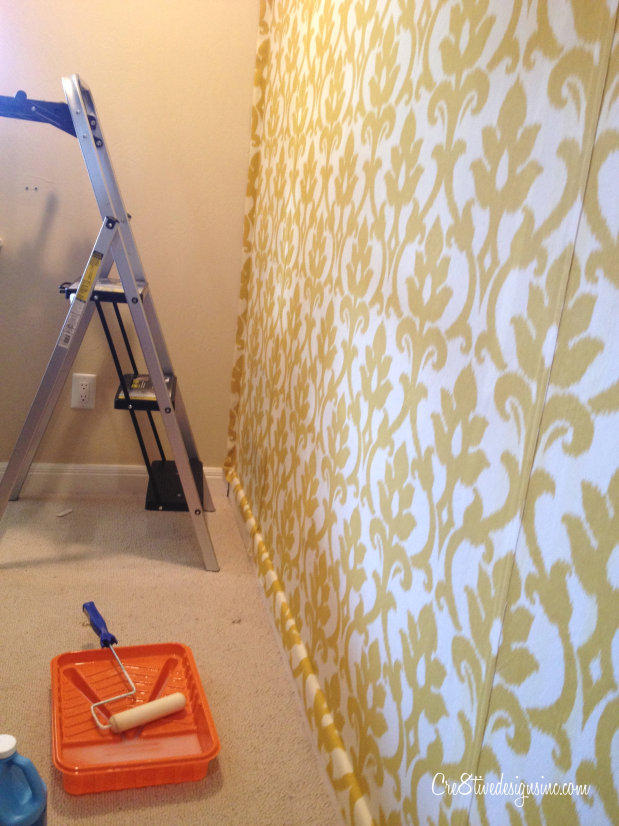
Since the fabric is 54″ wide, I lined my fabric up to the ceiling and tacked a nail in each corner to help hold the fabric while I positioned it and smoothed it.
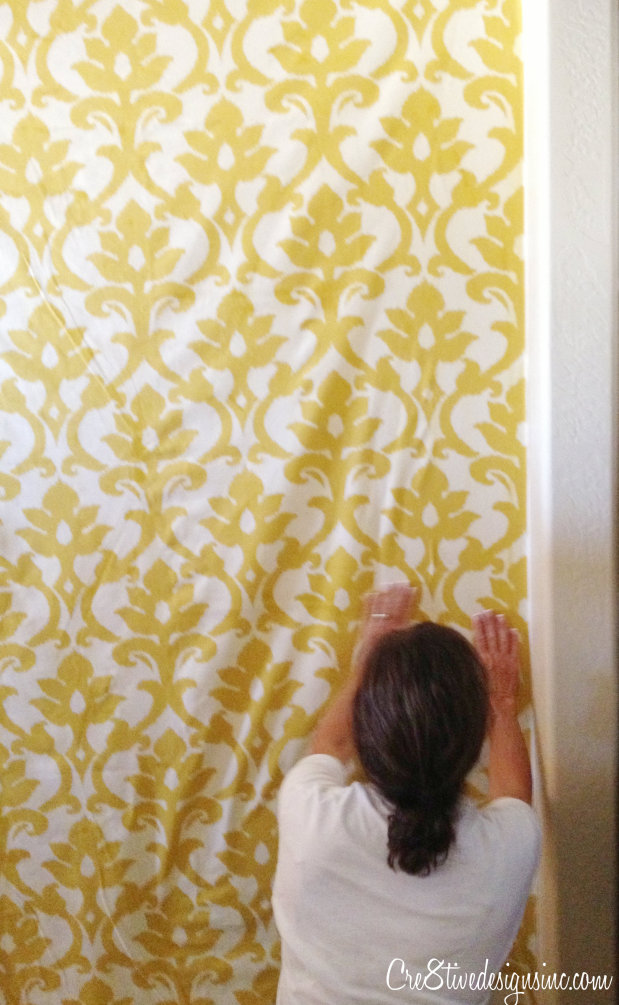
I started in the far corner, overlapping the edge against the wall and made sure as I went along that my pattern was straight. I worked my way across from the inside wall side to the outer edge of the fabric, then side to side, smoothing the fabric down with my hands as I went. Don’t worry if you have minor wrinkles in the fabric, they will disappear as you smooth them down.
The great thing about using starch, is that if it dries by the time you get to an area, {which mine was doing because of the ceiling lights were putting out some heat} you can reapply the starch to either the wall or the inside of the fabric {or both} and it will re-adhere perfectly. I also noticed I had some small areas that I missed in the middle where the starch had dried after I had the whole panel up. So I rolled my foam roller on top of the fabric in those spots and the starch absorbed through the fabric.
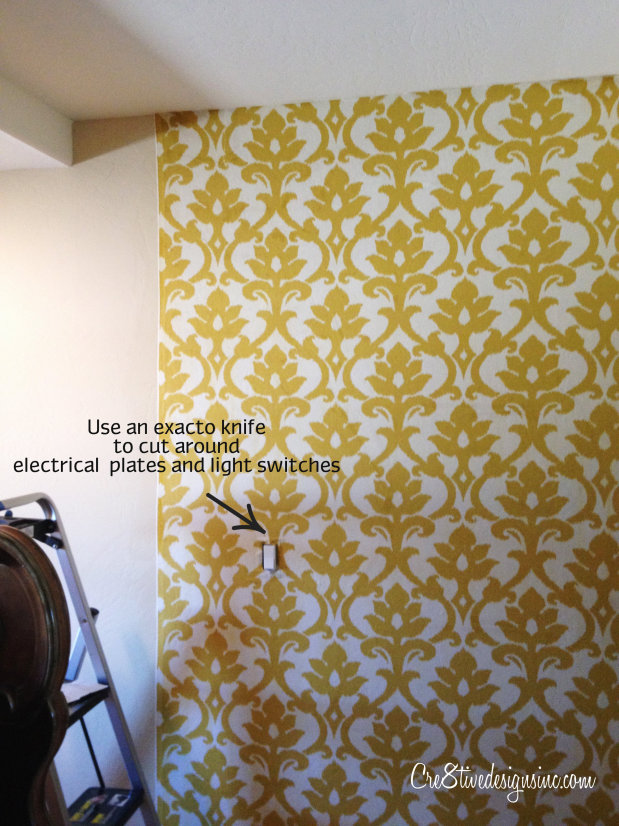
Here is a picture of the first panel up {man these are grainy pictures!}
If you have switches or outlets make sure you take the face plates off before you put your fabric panel up. Lay the fabric right over the outlet and switches when you are putting up your panel as if they are part of the wall. When you are 100% sure your fabric panel is perfect, then take an exacto knife and cut around the switch or plate.
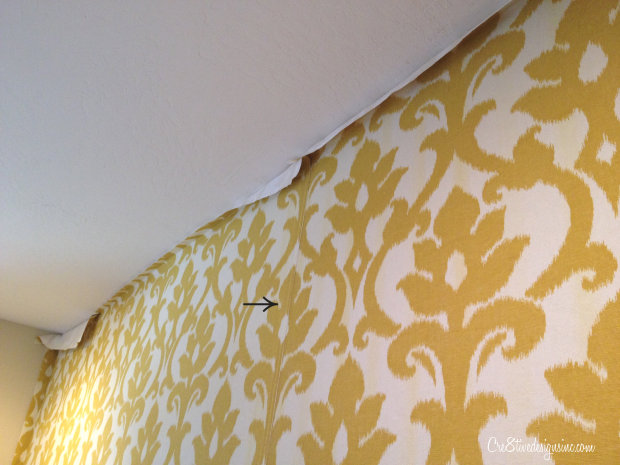
For the next fabric panel, I debated as to whether to butt the seams up {which means cutting a straight line, which I am terrible at} or overlap them. So I had my sister look it up on the internet, “how to do seams with wallpaper”. And this is what she read to me “if you want perfect seams hire a professional” We both laughed and I made the easy choice of overlapping the edges of the fabric panels, cause I’m no professional!
See the arrow? That is my seams over lapping. Honestly you can hardly notice the overlapping once it is all up.
On the areas where the fabric meets the baseboards and ceilings, make sure you take your broad knife {or in my case a piece of cardboard} and run it along the edge. It helps to seal the edges and give you a straight line for trimming. When the fabric is dry, do your trimming of all the edges using your exacto knife.
This tutorial turned out much longer than I had antcipated. It really is not a difficult project to do, hopefully my long post doesn’t discourage you from trying this method yourself.
Besides the fabric on the wall, I think my second most favorite thing in this bedroom are the Nest chairs. I put one in each corner of the room. Aren’t they fun? I found them at a consignment shop in La Jolla.
If there is something I didn’t explain clearly, feel free to contact me or leave a comment, and I will do my best to answer it. And if you put fabric up on a wall in your own home I’d love to see pictures!
Linking up to
Creating With the Stars, hosted by East Coast Creative.
Gail’s Catch as Catch Can at My Repurposed Life
Craftberry Bush Inspiration Gallery Link Party








Love it! You did a great job, and explained it perfectly!
Ohhh how I wish we could have a girls weekend at the river house….you , me, Cindy–that would be so much fun!
gail
Awe thanks Gail! Writing tutorials is hard, I never know if I write too much or too little. {most of the time I think it is too much lol} Book the flight and let’s go! I am ready when ever you are 🙂
Very nice. I never would have thought it would be easy to take down. That is awesome. Thanks for sharing =) I love that gold side table 😉
Thanks Kelly! It is so darn easy to take down yet stays up so well, its amazing how it works. The table is from World’s Away, love their furniture!
Hi! Looks great! How do you take it down? Does it damage the wall? Thanks
Lynette, it just peels off! No damage to the walls what so ever. There might be residue from the starch left on the wall which can be wiped down with a wet cloth.
of you do encounter any problems a cup of fabric softner in a gallon of water places in a ortho sprayer or spay bottle. the fabric will fall off the wall. this method also removes wallpaper and paper border that has been glued to the wall.
I also know how to get rid of the overlapping fabric.
where the fabric or wallpaper overlaps one piece is on top one is on bottom. you will be able to see the crease from the piece on the bottom on the overlapping piece. run your razor blade along the crease of the bottom piece. the top I’ve the overlap will be cut away leaving a perfect seam.
That looks awesome! You did an absolutely amazing job!
What a great idea! I’m scared of wallpaper but I might just have to try this! I would love for you to come link up to That’s Fresh! Friday and share 🙂
love this idea! i may have to try this!
Is the starch a type if glue ?
I am planning on doing this on the door to my 2nd grade classroom.
What a great idea Rebecca! Would love to see a picture when you get it done!
Rebecca I just used regular spray paint. I think it was Krylon. Good luck with your chairs!
That is AWESOME!!!!!!!!!!!!!! I want the look, but don’t want to commit to wallpaper. I can’t wait to do this!
I am trying to talk my husband into doing this in our dining room. Your room is lovely! One thing that has us confused…..fabric has a band/edge/salvage on each side that will need to be dealt with. Did you cut it off & if so, how did you overcome the fabric fraying?
Amy, I did have to cut the sides of the fabric {the salvaged edges} there was very little fraying. I just trimmed the strings with the razor once it was up on the wall. I am sure it depends on the type of fabric you use as to how much fraying you might get. I used a home dec fabric which is a little more thicker than a cotton. The starch also binds the fabric so once it is on the walls it does not fray. You should try a small piece on a board to see how you like it if you are unsure of how it will work with your fabric. Good luck!
Stephanie your article is a godsend! For months now I have searched for the perfect chinoiserie wallpaper to use in my sunroom. There are some beautiful wallpapers out there, but I can not justify paying $200 for a roll of wallpaper. Would 100% Cotton Twill be too heavy to work with?
Have you ever thought about scotch guarding the fabric a couple of days after it’s hung? One would have to consider what the effects might be, if any, combining liquid starch and scotch guard.
Could you do this on the inset of wood cabinets? Does it stick to wood? what about the unfinished edges of material, does it fray?
Marie, you could absolutely use this technique for cabinet insets. I have seen a lot of people use this method on the backside of curio cabinets or built-ins. As long as your fabric edges are trimmed of any fraying, the starch kind of bonds the fabric so it doesn’t fray. If it does, once your starch is dry, you can easily snip the frays with a razor blade or scissors. Hope that helps!
Can you starch fabric on a wall that is already wallpapered?
That’s a good question Angela. My guess is that it would stick. I would use the starch on a scrap piece of fabric first to see if it works. Let me know what you find out!
Did it work!? I’m hoping I won’t need to remove the nasty wallpaper already on the wall of my new house. If anyone knows if this would work or not, I’d really appreciate relaying the info!!
Amy, I would just try a scrap of fabric with starch on it and see if it works. I think it might work, but if the wallpaper is shiny, the fabric probably won’t stick. Good luck!
You are an excellent teacher! I bought some patterned fabric this past Friday with doing this in mind. I am excited to follow your exact step by step instructions. You are the best, and your room looks beautiful! Thank you so much.
Oh thank you! I don’t know if I would go as far as to say I’m an excellent teacher, but thank you for your kind words.
Do you think it would hold up well in a laundry room that gets quite a bit steam/moisture?
What if the textured wall is a smooth-ish texture? I would love to try this in my rental but the walls do have a slight smooth texture on them.
Do u think this would adhere to glass?
If you are thinking about a door, depending on if it is an interior door or an exterior door that might be exposed to condensation, or bathroom door…etc…. it may effect the bond. Luckily, there is really nothing lost except a small piece of fabric if it doesn’t work…I would try it. You could also use ModPodge on glass…that WILL work, however, taking it off again will not be as easy as the starch.
Hi, did you dilute the starch or use it “neat”? And where can I find it? Thanks.
I’m excited to try the fabric wallpaper in the home we are renting. The walls are painted by a professional, using a decorative design. Can I ruin the paint job? It would be worth it, if it can damage it.
Hi there! I happened to have stumbled upon your site just looking at how to upholster my daughter (who’s 18) old Wooden headboard as I couldn’t find myself letting it go (it was a LOT of $$ back then) I found that GORGEOUS headboard you had made with the velvet then of course I was drooling so, I ended up looking at more projects.. THANK YOU for showing all of your tips. Some designers wouldn’t dare be so friendly with projects but I live in Chicago.. purchased a Victorian and I couldn’t afford to hire anyone right now. Thank you so much for all of your info! you are my Favorite Designer!
Hi! I need to cover up an ugly wallpaper border in the house I am renting. Do you think I could just use this method for a border to cover up the old one? And I am wondering if it will stay in the old wallpaper, and not ruin it. Thanks!! Courtney
Hello! I featured your tutorial in a my blog series, Living in a White Box. My series features tips and ideas for how to decorate rental homes. Your fabric wall is a lovely way to jazz up a wall when you can’t paint, so I had to highlight it!
Feel free to grab a featured button and check out my post at Living in a White Box: White Wall Syndrome. Thanks for sharing your amazing creativity!
This is the best tutorial I have seen yet on doing this. I am going out today to find fabric for the inside walls of a curio I have. Once I get my confidence up dong that, I am going to tackle a wall in my kitchen. Will let you know how it turns out! Thanks for this post
Was thinking about doing this to my apartment. Since the walls are white I want to make an accent wall with a splash of color. Will the fabric bleed on to the walls and how ready is removing it?
Hi Sarah, I have never had a problem with the starch bleeding fabric, but I would do a test with a small piece of fabric before you put it all up on your wall.
Yeah! I’m definitely doing this. I’m so sick of not being able to do any bold decor projects because we are renting – so this is perfect!
So excited for you Marne. It is a perfect solution for renters!
Gorgeous! I pinned it for later – when I move, I want to have some ideas on how to change a place and make it my own. Also – I’m in love with that black chair that looks like a birdcage!
Thanks for the compliments! It really is a great way to add color or pattern to a room without damaging walls. That birdcage chair is my favorite! And it is so comfy to sit in. Like a cocoon.
So beautiful! Your old bedding…where did you get it? That is what I want for my bedding! 🙂 please please please reply!!!
Hi Crystal, the old bedding was purchased from Horchow.com many years ago. It was by Waverly I think. They still carry similar styles on their site. Or you might want to do a search for floral Waverly bedding.
Hi, I am wondering how much “wear and tear” it will take. I don’t have a headboard and was thinking of doing a piece of fabric on the wall. It is between 2 windows so I already have the trim, and I could add another piece of trim between the rosettes to be a faux headboard. I know, I know, I should just cover one! This seems easier!
that looks amazing! love the pattern you chose! stopping by from CWTS.
Could this methed work for a bathroom? Or would the humidity from hot water make the fabric fall right off? By the way love this idea!
I probably wouldn’t recommend using it in a bathroom, the humidity might loosen the fabric.But you could try it and see if it does, I have never tried it in a bathroom, so I can’t really say for sure.
Stephanie,
Thanks for your turtorial!! About how much did you spend in total on all the supplies? Also, how long would you suggest to wait to do this on fresh paint? My apartment was painted about a week ago. Thanks!!!
Hi Natalie, I am no expert, but I would think that after a week the paint should be cured enough to use this application. I would love to see pictures if you try it!
Great explanation! Can’t wait to get started in the morning! Thank you!
Colleen
Where do I purchase starch? Is there a way to make my own?
You can purchase starch relatively inexpensively at Wal-mart or Target. I don’t know if you could make your own, you might have to google that one 🙂
Ok, I did a 60″ x 45″ piece on a bathroom wall yesterday, and today I have all kinds of bubbles. Can I just pierce little holes and reapply starch, or do I take it off and start over?
Can you use this technique over wallpaper or will it damage the wall paper. I’m looking to spruce up my kitchen!
I NEVER post… rarely. … BUT the step by step instructions you gave are THE BEST.. thank you.
I need some help, I am renting and have paneling walls and want to change them, without painting them . something tempory.. I seen the fabric process and didn’t know if this would work, without damaging the walls??
Thanks so much for the detailed tutorial! I’m looking forward to try this!!
I did this in a mobile home I was renting but instead of the wall I put tissue paper on my bottom half of my windows for privacy. I had white sheers on the windows to let in light. I “sprayed” on some liquid starch on the window pane then applied the piece of white tissue paper….spraying extra starch as needed. Held up for two years then which I spray with warm water & removed because I moved. I am going to try this with a sheer voile fabric this time instead of the tissue paper for privacy.
Would this work on cement walls?. I just moved into a rental house and am making the unfinished lower level into a living area for my daughter and new grand baby. Some walls are painted brick and some are unfinished dry wall
I don’t think this will work on brick walls. It would show all the lines of the brick and would not lay flat.
I want to try this on a very large wall in my office at work. I am buying a removable wall mural (expensive!) and to save money, I want to edge the mural with fabric, sort of like a matting around a picture. I am wondering whether I can get the fabric to stick to the office door as well, so that when the door is shut, the door will hardly be noticeable. The door is very flat surfaced. Do you think this technique will work to get the fabric to stay in place or does the surface need to be more porous?
I am renting and the landlord does not want us to remove the current wallpaper. I am wondering if this technique will stay on old wallpaper without damaging or ruining the wallpaper underneath? Thanks!!
I don’t think it will damage it at all. It’s just starch and it wipes off easily once you take it down. You could try a small piece of fabric in an area and to test it first.
It will leave a starch residue that will need to be wiped off the wallpaper. So I don’t know if that will damage the wallpaper since I don’t know what type it is.
I applied some gorgeous cotton fabric to my wall with spray starch, but I’m getting bubbles as it dries… any idea what went wrong and how I can fix it? I smoothed it out so nice as it went up, I’m bummed about the bubbling/wrinkles.
Thank you!
Great tutorial! I can’t wait to try it in our new place…
This is great!
So my question is:
Can I put this over brick? I live in a rental with a dark red brick, oppressive fireplace right in the middle of my tiny living room…I’m trying to brighten the space for spring but the only thing I’m not allowed to paint is the fireplace :/
Anyway, wondering if I can use this over the brick…even kinda smooth it into the lines, just so it looks like white brick without the paint?
I tried googling this but just get ads about white brick wallpaper. Lol.
Thanks!
Jen I believe it would work if you use a medium weight cotton. Good luck!
My husband and I tried this on 2 walls in a guest room. The hardest part was overlapping the seams. I chose a black and white damask that wouldn’t quite line up. I ended up pulling it all down washing the fabric on a gentle cycle and line drying. I will be attempting on smaller walls in the same room. I will say though, the original walls we put it over, when removing, it did pull off the primer. I didn’t paint them, only primed because well, I was going to hang the fabric. I think with a stronger bond of paint, this wouldn’t have happened.
I have had that problem with damask fabrics as well! The pattern never lined up…weird. I am glad that you are going to give it another try, it truly is an easy fix once you get the hang of it. Makes a great impact in a room.
This may sound stupid, but has anyone tried this on wood flooring? I ask because there is an apartment I’m interested in renting, but the wood flooring is no good. (I love wood floor, but theirs just look awful).. do you think the constant traffic would keep it from staying put, let alone the hassle cleaning it would be..
I don’t think this application would work on flooring.
Hello,
Not sure if this question has already been asked. I have never used liquid starch before and I wanted to know do you have to mix it with water or use it as is?
Thanks in Advance for the reply.
Oh, Awesome job by the way!
No you don’t need to mix it with water, you use it straight out of the bottle.
Can I do this method on a plastered brick wall.?
You can test a small area out and see if it works. I have never done it on plastered brick walls.
I would like use this method to cut out fabric letters to adhere to a wooden door. Any ideas if this will also be easy to remove off a wood door? I really don’t want to ruin the door, so ruled out decoupage.
Yes, this would work on wood letters. But I use spray adhesive or modpodge when I do fabric or paper on wood letters.
I would say it wouldn’t, but I always suggest trying a small piece first to see how it will adhere and then let it dry and then pull it off to see if there is any damage. I have yet to experience it damaging any surface, but I haven’t tried all surfaces 🙂
I’m so excited to try this out. Is there a certain type of fabric we should be looking for or is any kind okay?
Can’t wait to hear back so I can get started!!
You should use a fabric from the home dec fabric section at a fabric store.
Is there any chance of a fire hazard from this? I’ve heard that starching things makes them more susceptible to fire and I wouldn’t want to do that to a wall. Thanks for posting such a detailed tutorial.
In my opinion, the fabric would not be any more of a fire hazard than wall paper would be. Or the bedding that you would have on your bed. But I am not an expert in that area, if it is a concern I would suggest asking someone who is more well versed on the subject who can give you an expert opinion.
I did this last night to my wall in my living room. I left it to dry overnight and this morning I have huge bubbles in my fabric on the walls. What did I do wrong. Because it was definitely flat and saturated when I finished applying the starch. I used a spray bottle, sprayed the starch on the wall then on the top of the fabric. Any thoughts?
Jacinda, I never use a water bottle to put the starch on the walls and fabric. I use a roller on the wall and then on the backside of the fabric. If after I get it up and I notice spots that aren’t adhering, I roll the starch on top of the fabric as well in those spots, and then use my hand to smooth down the fabric.
Hi, Stephanie! I love your tutorial. I am thinking about doing this for my kitchen. Will the fabric and starch be okay around the heat? Thanks- awesome post!
I wouldn’t recommend putting it in a kitchen. It really isn’t wipeable so to speak, like a vinyl wallpaper would be. If you don’t cook much, then I’d say go for it!
I am doing it in my kitchen! But covering the backsplash area with plexiglass to protect. 🤗
Good idea!
I love this idea! I was really considering doing it in my apartment to make it more home like. How do you remove it for when you move out?
Amber it is really easy to remove, just peel it off. It’s best to wipe down the wall for any starch residue that might be left on the wall.
Your bedroom came out absolutely fabulous. You provided great instructions which is truly appreciated. I was wondering where did you purchase your starch from? I’m really considering this project for my foyer . trying to do something different for a quick pick me up.
I bought the starch at Wal-mart.
Hey love that wall and I’m completely up for it. Just one question is it waterproof cuz I plan to do it on my backyard wall and its raining all the time. Thanks xo.
It is fabric, so it doesn’t repel moisture. And if you used a sunbrella type fabric you couldn’t get the starch to adhere due to the coating they put on the fabric.
I have a wall that has granite tile on it. Do you think this method would work on such a smooth surface?
I was wondering if I could use polyester fabric to do this? I found the most beautiful fabric but am unsure about how the polyester and starch will adhere. Any tips? Thanks!
I would buy a swatch and try it out. It may have enough tooth in the fabric to absorb the starch and stick to the wall. I have only used cotton fabrics.
I started this project on a large wall I have in my rental studio. The wall needed five vertical panels to be covered, which I am overlapping because the stretching ends up with the seams not being straight (all good). I put up one panel and then ran out of the extra liquid starch I had on hand. Unfortunately, When I went to put up the next panel, the joints where I got fresh liquid starch on the fresh panel dried with whitish stains that look like excess starch that the fabric cannot absorb, and which dried flakily on the top of the fabric. I have thought about doing a lite coat of starch over everything to simply make all the stains “even” or rollering it with water to try to wash it out but am not sure if that will dissolve the starch or leave me with a new set of stains. Ultimately, I can always remove them from the wall, wash them, allow them to dry, and then rehang them but Its a lot of work, and this will likely happen again since I will still have overlap. Has anyone else had this problem and devised an on-wall solution? Or have thoughts on my current theories?
Thanks!
It sounds like the type of fabric you choose just shows the starch more than a patterned cotton fabric. I would take a clean wet cloth and wipe off the excess starch on the overlapping areas. That should work. Good luck!
I’m still not clear on aligning the panels. My fabric, a skinny ulrasuede ravels. Are you saying I should hang a panel with 1/2 inch selveges on each panel? Once it’s dry,use a very sharp xacto to trim the edges. Then hang the next panel using the same technique? Sorry, but I’ m visual. Is there a utube for this? Thanks!
I am sorry to hear you are having issues with your project. I wouldn’t recommend using ultra suede for this type of technique. I usually use a cotton fabric. But if you want to try it, I would put up all the pieces, over lap the edges and once it dries, go back and cut the overlapping edges. The starch might help “glue” the fabric to help the fraying, and make it easier to cut without fraying. If they do fray, I would take a small paint brush and paint some starch on the edges to stop them from fraying.
Hope that helps!
This looks to be the solution to the ugly walls in my rental. I’m looking forward to seeking out the right fabric. Thank you!
Have you ever tried this on a ceiling? I have a utility room (6×8) that I would like to try this with, but am not sure the fabric would “stay” up…any thoughts? Thanks!!
If the ceiling is smooth and you are not using a heavy fabric, I would think it would work. I’ve never tried it, but it’s a great idea! Maybe try a swatch and see. That’s the best advice I have 🙂
Do you think you could do this with a bed sheet ?
Hi Gail, you could use a sheet as long as it doesn’t have a finish on it. Sometimes manufacturers put a liquid on the fabric for shine or stiffness. If in doubt wash it first, and then try it. Otherwise, a sheet is just a huge piece of fabric at a great price, so I think it is a genius idea 🙂
Hi,
I was going to do this, but a friend said that because starch has food ingredients, it attracts bugs, Any issues with that?
Thanks!
I am not familiar with any bugs attracting to the starch. It might be something to consider depending upon where you live. In San Diego, we are pretty mild and dry weather.
Hi everyone! I’m renting a place with wall to wall wood paneling and really want to try this trick. I’m terrified of damaging the walls though. Has anyone tried this with wood paneling and checked for damage after removing it? I’d love to hear your experience!
The only concern I would have with wood paneling is the grooves showing through the fabric. I have never experienced any damage using starch on fabric. If anything, it can leave a residue, but that can be wiped off. Now the removable wallpaper that’s out there, THAT can cause damage. I’ve tried both, and hands down, I’d use the starch method over removable wallpaper any day.
I bought several posters from Art.com and they wood mounted them. I asked them if I could use this they said no. What do you think?
Thanks!
Geri
I don’t really understand your question Geri.
Hi!
This looks amazing! I can’t wait to try it out on my new rental apartment! I cant believe it took me so long to discover this site! 🙂
Can this method be used on wood instead of walls though? Will there be issue with the wood soaking up the starch?
Thanks!
I have only used it on walls. I would say that it would depend on the state of the wood. If it has a finish on it, that will protect it from the starch soaking into the wood. But it may also not allow the starch to adhere. As I always say, try a little piece of fabric first, let it dry and see how it works.
What do you think about fabric sticking to tile? I want to cut little 4″ squares and put it on my kitchen back splash? LOVE this room and tutorial!
You could try it out and see. I have never done any starch and fabric on tiles, but it could work!
How would you clean the fabric?
A damp cloth should do the trick
Can you do this over old wallpaper ?! I rent an apartment with some awful wallpaper wondering if it would come off easy or ruin the wallpaper ?!
I think you can! It all depends on the porousness of the wallpaper. I’d try it with a scrap piece of fabric to check. A cotton type fabric works best
Hi, I really want to do this in my dining room, but liquid starch isn’t easy to get hold of in the UK. We’ll have to order it online (Amazon). We can get the one you mention here: ‘sta-flo’ but it’s expensive: £65 for 64 ounces. Alternatively, we can get ‘liquid starch concentrate’ which is alot cheaper at £16.99 for 5litres. https://www.amazon.co.uk/Starch-Solution-Concentrate-5L-Anti-Bacterial/dp/B0040J0NZY/ref=sr_1_2?ie=UTF8&qid=1485793710&sr=8-2&keywords=liquid+starch
Do you think it’s the same? I don’t want to use the wrong one and then find I can’t get the fabric off the walls!!
Wow! That is pricey! I would think it would work…it is just a concentrate of the liquid
does it work on concrete walls?
does it work on concrete walls?
It could..if the concrete is porous enough to hold the starch and fabric.
Do you think this technique would work on a large mirrored wall?
Do you think this technique would work on a large mirrored wall?
I think the fabric needs some type of porous material behind it to absorb the starch…but you can try it with a scrap piece of fabric..